
Unfolding superhuman powers
Destruction on end time level and a baby in between – the Filmakademie team of “BreakingPoint set high expectations for realizing this final movie. Now the team is talking about this extensive process.
Christopher McKissick was extremely keen on planning this animatic and the following previs as precise as possible. Next to that, the producer team organized everything necessary for shooting the planned movie. His included a whole bunch of RnD tests as proofs for the concept. It took 11 days to shoot the movie – 6 days at the actual set, 5 days in the studio. The postproduction took – fitting the theme of the movie – 9 months.

Previs & animatic
While finding the right idea Martin Lapp also created numerous moodboards and concepts – mostly in Photoshop or directly in 3D to be more flexible. The team only spent one day for the storyboard itself, after that the director decided to directly work in the 3D animatic in Cinema 4D; for one reason because there was no real storyboarder included and Martins drawing skills soon reached their limits. Another reason was the fact that the 3D artist got a much better and faster overview in 3D of what will be possible and what is out of reach. “Especially with a lot of fast steps and complex resolutions it is usually much easier to just move and rotate the viewport camera and to move the 3D model than drawing everything over and over again.”, Martin Lapp knows. Over time the animatic got more and more details, animations got more complex and finally, the transition between animatic and previs was smooth. This previs was actually helpful to orientation in the final movie by just layering it on top of it. As soon as all locations for shooting were decided, the team started scanning these with Agisoft Photoscan and implemented it in the previs.
By considering the correct scales it was possible to make all important decisions for looks, speed, camera height and angle way before the actual shoot. This made room for using the Physical Sky to determine the exact state of the sun for every hour of the day, which made it easy to calculate shadows as well for a clean look. The team put a lot of energy and time into this previs due to weather dependency and inflexibility. That´s how they turned into the central virtual production tool. Without their help, the movie could have never been finished.

Cameras of choice
Since “BreakingPoint” was a student diploma project the team had a lot of time to plan and produce everything. In the real movie industry, no one would be willing to pay for such an amount of time. For about two minutes of movie, it took 6 days of filming outdoor scenery in Ludwigsburg, Stuttgart and the Bavaria Filmstudios in Munich. In addition, it took another 5 days to shoot in the studio of the Filmakademie itself which were focused on filming the baby, 3D-Scans and debris recordings in front of the greenscreen.
For outdoor shootings the team chose Alexa. However the Arri Amira was available as well, that´s why the team switched to this camera model instead because it can definitely keep up with Alexa from a technical point of view. All highspeed scenes outside and in front of the greenscreen were shot with Phantom v641. Sony F55 was an addition for shooting in the studio, because of its higher resolution and its feature to shoot in raw-file which made keying in post much easier. Before the actual shoot, the team practiced every scene with either a DSLR or an iPhone (240 fps) at least once to answer all possible questions on set if something came up. Cameraman Chris McKissick did the shot with the coffee cup that is falling to the ground by hand at the set of Bavaria.
Finding a newborn
Before even starting this project one of the biggest challenges was to find a fitting baby actor. After asking all relatives and friends without any luck the team approached mothers with their children directly and told them about the movie. “But as soon as you start to talk about the story in this movie and that it is planned to throw the baby out of a window there is no high chance of success. Of course, no mother wants to give her baby away for such a purpose – especially when it is going to lie in a green appliance with a 10kg camera directly hanging over it and taking pictures of it”, Martin Lapp says. Luckily one day before the shoot two fitting babies were found in a hospital. Actually, both babies are in the movie as well: The one falling is a different one than the one given over in the hospital. Since a baby doesn´t respond well to given commands a full CG hand had to be created to get the right shot. Christian Leitner sculpted the hand with all its small details in a short amount of time in ZBrush. Marcel Ruegenberg created a procedural skeleton afterward which could be seen by subsurface scattering. In addition, the artist also took over the look development of the baby hand. The animation was created by simple blendshapes rather than a full rig. Unfortunately, the whole work can only be seen in the breakdown since the DOF is hiding a lot in the final shot.

Stunt digidouble
At the beginning of preproduction, it was planned to use motion capture. After the team got to know it better they decided that this technology did not really fit the movie. It would have taken at least two more additional days and since most of the scenes had to be shot in real anyways motion capturing would have only covered stunt scenes. Since all these scenes are quite short it was easy to decide that those scenes would be animated by hand. This also made it much more flexible in post. The team used a scan cabin for those digidoubles with a cylinder array and 24 parallel set DSLRs. The actor is standing in the middle of it. Usually, those cabins are used for 3D prints, but the students were lucky to use this setup from Project3D from Göppingen (project3d.net) for free. All of this was scanned in Photoscan and modeler Christian Leitner cleaned up afterward.
One day, one shot
Right after shooting the material went to cutting. Since the most of it is background material it wasn´t easy to find out how these shots had to show up. Again previs was a helping hand by layering it over the plate in Premiere with 50% opacity. Right after the timelock, the process moved forward to Postvis. In this case, the team decided to choose a more unconventional method. The director wanted to have an early version of the movie ready as soon as possible, so Martin decided to prepare one shot a day. Since the movie consists exactly of 30 shots the plan worked out fine. Every day of August the artist started by tracking one shot in the morning in PFTrack, set roughly all animations in Maya, set the timing and position for explosions (generic alembic explosions from Houdini with time offset), stitched with ptGui and graded the HDRI in Nuke. After that, he put all lights into the right place and finalized the shading in Maya. Then he rendered everything at the same time at once (Arnold + Royal Render) and set up the comp in Nuke, so every evening the first version of one shot was ready. The students wanted to work for postproduction as iterative as possible, so the quality of the whole movie can be raised simultaneously and all energy won´t be used up in the beginning by concentrating on single shots too much. Another key factor was the Postvis because every shot was already set up and they only had 8 months left for polishing. Of course, this approach changed the more they reached the end of the production and the whole team concentrated especially on hero shots and heavy problems.

Division of labor & pipeline setup
At the beginning of September Martin, art director Thomas Sali and the team sat together and discussed all shots. Every upcoming task has been shared and all working days have been decided on this day, so VFX producer Francesco Faranna could include these in his overall calculations. Some shots already looked quite nice on September – others, however, showed pretty clear that more time needed to be invested. It also became clear which shot will take longer during cutting. At the same time while Martin was working on the first version of the movie head-td Johannes Franz set up the pipeline for Houdini and worked on proofs of concept for upcoming work in effects. Nicole Rothermel worked together with Martin Lapp in terms of asset creation and photogrammetry of many props which have been photographed in the studio before. After scanning everything the team cleaned it up in ZBrush and created UV layouts which were imported in Agisoft afterward for texture creation. For everything else regarding texture work, Mudbox was the program of choice. After this, the team set up every single asset with the right scale in Maya, realized the shading in separate unified shading scene which has been prepared before. This helped to always stay consistent with the result. All rendering happened in Arnold and Mantra. Since Martin worked on lighting, animation, and compositing at the same time the whole process was quite iterative, but also risky, because he used the same scene for lighting and animating. With too many references in one scene all light linkings and render layer in Maya may crush eventually. But the problem was solved with custom tools, which were written by pipeline-td Alexander Richter for Maya and Nuke. During the process of production, Francesco developed the “command center”, a dynamic online chart which contained everyone´s task and process. Like a mini-shotgun for a small team which took over the original organization tool Trello. (DP issue 07:16, “Shoogle!”)
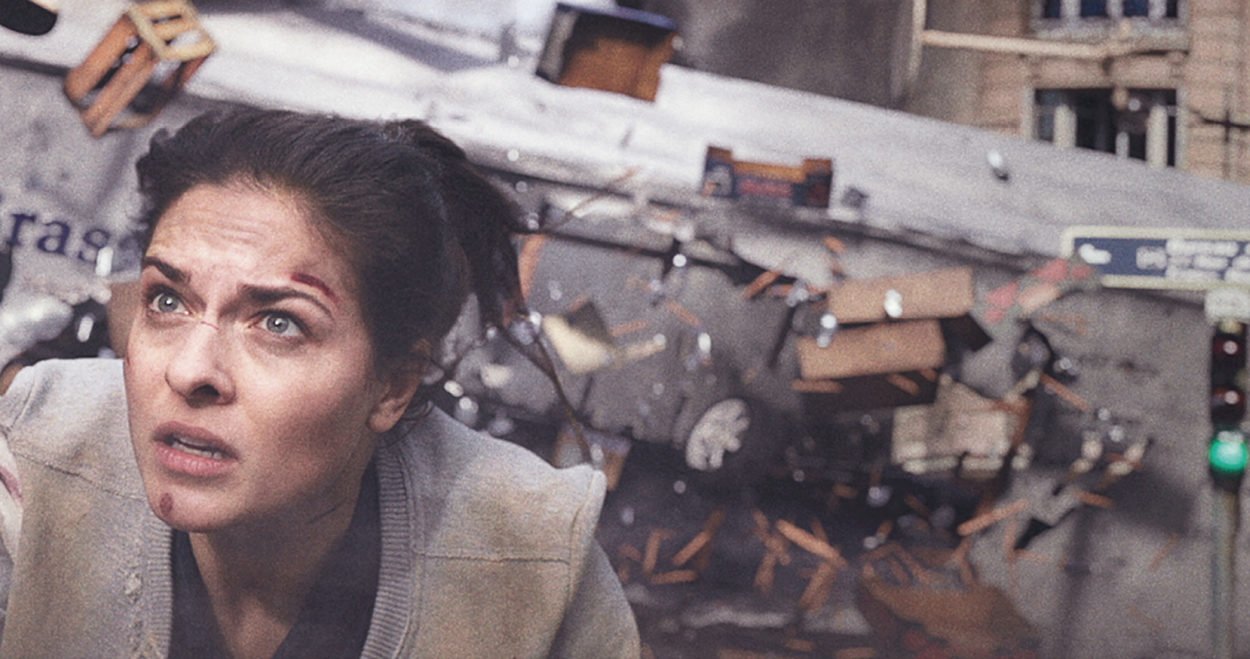
Destroy everything!
As a VFX student at the Filmakademie with love for Hollywood Blockbusters, Martin Lapp was sure to create something which comes close to a Roland-Emmerich movie in terms of destruction level. Especially at the end of his studies, his motivation was big enough to again take on the challenge to make a difficult and VFX heavy project. “When Martin showed a style frame and the animatic of BreakingPoint during the presentation I was convinced that this will be a good one”, so lead td Johannes. Since the artist didn´t have a real chance up to this point to produce a huge level of destruction “BreakingPoint” was the ideal platform to learn more about it and to evolve his own abilities. Houdini convinced for this task with its procedural workflow which provides different solutions for destruction and interoperability. This way Johannes was able to let different solver interact with each other and let those results of a simulation work for a second effect as well. Since a lot of effects over multiple layers were used the possibility to scale everything with Houdini’s procedural approach really was a huge help. Setups created in one scene could be moved into another one without any problems and relative dependencies were considered as well. After every iteration and feedback, it´s always been possible to go back a few steps and make adjustments.
Houdini Solver
With Houdinis RDB-, Bullet-, Finite elements and PBD solver various possibilities for creation destructions are provided. For “BreakingPoint” the students mostly used Bullet and Finite elements. The Bullet engine has its roots in the gaming are and can handle convex geometry very well. The team mostly made use of VDB fractured objects which look a lot more natural than usual Voronoi stones which cannot smoothly be simulated with Bullet. The team simulated volumes with a small resolution. Details were created via displacement during the rendering process. To break up the pattern of the noise field the team created the first frame of the simulation in a scalar field and vectorized it. This worked as an amplitude for displacements. “Those tricks only work as long as the volume still looks realistic. Today I would rather use gridless advection to get pixel perfect details which don´t cost a lot of hardware power. With this, the volume of a pixel gets shifted via a velocity field during the rendering. Such optimization makes working with Houdini interesting”, Johannes Franz explains.
Houdini helper
Johannes trusted a lot in the HAD system of Houdini for developing additional scripts and he built the project file caches, wrapper HDAs for often used setups, shader libraries and presets. For all these numerous explosions the team created three generic explosion versions as assets. They had to be synchronized since the team used the rigid body system (RBD) in Maya/Arnold and rendered all secondaries in Mantra, so smoke, sand, and all other particles would behave the same way as the rest of the scene in terms of position and timing. Martin spread all RDBs in the scene and Alexnder wrote a script which saved all transformations and delays of every single explosion in this file. These were attacked via a special HAD in the scene which also affected all secondaries (smoke, particles, and sand) as well, so position and timing were always the same ones as in the Maya scene.
Rendering
In the beginning, Martin thought about using GPU rendering. For this, he tried out redshift in a previous project. But since it became clear quite early that this project would contain a lot of geometry and textures in one scene the team voted for Arnold and Mantra instead. And for all fluids and particles Houdini. Listening to pipeline-td Alexander Richter the team relied on the AL-shader of Arnold instead of its standard-Arnold-shader fairly early. Its easier to set them up and they are used in numerous studios and offer more settings than the standard ones. Alexander was responsible for the Maya part of it and worked with his own pipeline for it. Renderings from Maya were optimized far enough, so frames rarely took over 5 to 10 minutes to render which generated a nice overview. The longest render time was about 20 minutes for the close-up shot of the mother who is reaching out with her hands for her baby. This was one of the full CG shots which has been generated with multiple 8k textures, direct motion blur and shallow depth of field. The students were able to use the render farm provided by the animation institute. These jobs are split up directly with Royal-Render-plug-ins to the required software – with this most of the shots were rendered through the night.
Final grading in Hamburg
Since 3 different cameras were used the team faced 3 different formats and they were all combined in DaVinci at first. After that, the plates were converted into linear .exr sequences in Nuke. To match all shots with each other the students made a neutral grading for all of them. During postproduction, all artists worked with a pre-grade directly in Nuke. Grading happened with a base light in two rounds: The main grading has been done before the diploma presentation. After that, there was another grading-correction for shots that have been changed. Martin designed a “grading-bible” where he gathered a collection of different references and moods for the aimed scenario, color contrasts and much more. For final grading, the team was lucky enough to get a sponsoring from “Harvest Digital Agriculture” (www.harvest-technology.de) in Hamburg, thanks to producer Anica. Cameraman Chris and Martin traveled to Hamburg for 2 days and forced out the last 10% for looks together with grader Nico Schwartau and Laura Steindorf. For acoustics, composer Petteri Sainio provided a handmade score, which came to life with the help of the film orchestra Babelsberg and a Dolby-Atmos mix by sound designer Tobias Scherer.
Challenges
The most annoying shots for the team were the ones where dependencies on things like weather, time, light or the set itself influenced the outcome. Some shots required set extensions which meant that big parts of the Plate had to be replaced or they even needed to be created in full CG to be more flexible in regards of staging the shots. Shots which were already complex even got more difficult with it – and did ask for night sessions to finish in time. Also, the different interpretations of the motion blur in Mantra and Arnold did force a few holdout problems during compositing and required more paint corrections.
But compared to the complexity of the entire project it really worked out fairly well without huge problems in the way. “Thanks to the planning in advance, the infrastructure of the Animationsinstitut and the great team”, Martin is certain.
Saving up storage
The end of the project came up with 12 terabytes of data: 5 tbytes set data, 7 tbytes of postproduction. The animation institute offered 15 tbytes of storage – But Johannes Franz was calculating with around 40 Tbytes. So the FX pipeline was set up in a way to work efficiently and to save storage. The biggest files contained FX and Mantra render caches. Since a few effects have been reused the team set them up as assets and referred them in shots as delayed load. Volumes have a small resolution, because they are saved as point cloud in the first frame of simulation and animation. For the RDB simulation rendered in Maya/Arnold it had to be saved via alembic brute force. In the end, those alembics were the biggest files. The render caches were the biggest ones first with numerous Gigabytes, but thanks to delayed load and BLOSC compression they shrunk down to a few Kilobytes.
Best student
Project “BreakingPoint” has been presented on numerous festivals, like Anima Mundi in Brasil. It also got the award for “Best student project” at this years Siggraph Asia in Macau. “We are extremely happy to bring such an important price for our diploma to Ludwigsburg”, director Martin Lapp happily adds.
(Mirja Fürst)